
Buy a cheer leader costume pattern - Simplicity 9798 (out of print) or Simplicity 3689, McCalls 2849 (out of print) and Stitch 'n Save M4568 (also by McCalls, may be out of print). This pattern works for the top because you have the stand up collar. Remember you will put in a zipper in the back or buttons what ever you preference.
We have found it best to use the Heavy Duty separating zipper for jackets - why? Because it stands up better for quick costume changes when the girls are striping off their costumes in a hurry and putting on a new one.
Updated Jalisco Instructions (May 21, 2013): Still in progress *** denote a picture to be placed.
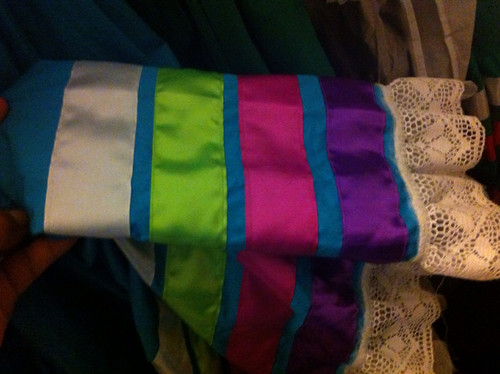
Topeka dancers: Ribbon color is important, MUST be two light and two dark inorder of lightest to darkest.
Measurements: Bust, Waist, Arm Length, Base of Neck toWaist, Shoulder Width and Waist to Floor with dance shoes on.
Skirt: Cut 19 strips 12” X 44”.
- Sewn together these form bottom ruffle of skirt. Will measure approximately 23+ yards. I serge unfinished edges of “Ruffle”.
- Sew darkest ribbon color 1.25” from bottom. Ribbons are spaced 6/8” apart, lightest color should be last color sew on.
- Once all ribbons are sew on Ruffle, hem top of Ruffle. You should have 2”-2.25” from lightest ribbon to top edge of Ruffle before hem.
- Sew ¼” lace to Ruffle: allow for ½” hem and then ½” below hem line will be gather line where Ruffle will be sewn to skirt. Lace will be sewn ¼” below gather line.
- Sew lace to bottom of Ruffle. I use 2.5” to 3” lace on the bottom
Cut 12 panels that will be sewn together to make the Roundof the skirt.
Note: Everyone hasa method for creating the “Circle” and you will hear people describe skirt ashaving “Double Circle”. This is my method of making a Jalisco and judgingfrom my daughter and other dancers there is more than enough material in theskirt.
- How long should panels be? Well take your “Waist to Floor” measurement, subtract 11”, subtract bottom lace 2-3”, subtract waist band 2” and that is your number. Example: Waist to Floor 40”. 40”-11”-2”-2”=25”
- I use a cardboard cutting board I bought at Joann’s but I have seen at other craft stores. There are pre-drawn wedges on the board and a 1” grid pattern. I usually start at the 8” or 9” line and then measure down the number of inches, in our example 25, so if I started at 9” line I use the 34” as my bottom line and then select the wedge that will fit my material width.
- My material is 44” wide and I put the fold on the 9”-34” line and the open end on the wedge line. With my material folded it is 22” wide. I cut the first panel and then use it as a pattern to cut the next 11 panels.
- Sew 6 panels together, set aside. Then sew next 6 panels together. I serge my seems for a finished look and for added strength. I also serge my unfinished edges.
- You have to decide which method of waist band you are going to use. Double tie or one tie.
Note: If you are using the double tiemethod which is what our instructor prefers you will connect your two 6 panelskirt pieces only on one side and leave top 8” inches unattached. If youare using single tie you can sew all 12 panels together but leave open to makeit easier to attach Ruffle. ***
Attach your waist band:
- Double tie method: cut 3 strips 4.5”X44”, Each tie will be 66” long, one of the 4.5”X44” will be cut in half. Take your waist measurement, Example: Waist 28”, add 4” and divide by 2, 32”/2= 16”, the 4" allows for 1" overlap on each side. Mark center of tie, and then measure out to your calculated number; in our example 8”, so you would mark center of tie, measure out 8” from center to the left and then to the right. ***
- I use my serger to gather which is pretty easy by adjusting the differential feed (http://sewmamasew.com/blog2/2012/08/sewing-basics-ruffling-easing-with-a-serger/) here is an excellent link (why recreate the wheel? LOL).
- Pin the center of the 6 sewn panels to the center of the tie (3 panels to the left and right of center). Then pin the end of the waist of the panels to the your 8” mark. Note: you might want to finish the top 8 inches of your panels for a finished look. ***
- Once the waist band is attached fold over, Note: Pre-ironing will make this easier. Fold strips length wise together and the iron so that you have 2.5” on either side of ironed fold. ****
- Once each tie is attached you may sew one side of 6 panel pieces together, remember to leave skirt “open” to make it easier to attach the Ruffle.
Attach the Ruffle: - ***
- I use what I call and ruff but easy method. I section off the Ruffle into 12 sections, I mark the center of each section. Example: Ruffle is approximately 817” long. 817÷12= 68.08 inches. Round to 68”, 68”÷2 = 34”.
- Now I have 12 sections marked off with center marked and I have 12 panels in my round marked by seams and by fold line in the center of each panel. Pin a section of the Ruffle to each panel (12:12 easy) and pin center to center of fold (marked section center to fold center of panel) and then pin evenly throughout section. ***
- You can pin then sew each section or you can pin a couple to a few and sew – your preference. Sew slowly and watch your material closely. The panel ends are rounded and you Ruffle is straight, sometimes the panel with fold over onto itself. And you will have to rip out the seam repin and resew.
- Once your Ruffle is attached, you can “close the skirt”. Sew open end closed!
- Attach suspenders (optional), no trick here, refer to the picture - it keeps the skirt in place. ***
SKIRT FINISHED!
Top:
- Use top front, top back, neck*, and sleeve pieces.
- Base of neck to waist measurement – add 2”. Measure on you back pattern piece from base of neck to down. Example : Base of Neck to Waist 18”, 18”+2”= 20”. Mark waist for cutting on back of pattern piece at 20”. ***
- Use this same measurement, example 20” to mark waist line on front of top pattern piece as well.
- Cut front top on piece with center on fold line.
- Cut 2 of top back, they will be joined by separating zipper. Use heavy duty coat zipper match color the best you can.
- Cut out waist band, 3 pieces. Take Waist measurement, Example: Waist 28”, add 3.5”, 28”+3.5” = 31.5” divided by 2, 31.5”÷2= 15.75”. For front waist band piece add 1”, 15.75”+1”= 16.75”, this gives ½” seam allowance on each side. Back waist band pieces, 15.75”÷2=7.87” add 1” seam allowance to each 7.87”+1”= 8.87”, round up to 9”. Cut 1 piece for front waist band, 2.5”X15.75”; Cut two for back waist band, 2.5”X9”.
- Sew breast darts to front top piece. ***
- Sew shoulders of top front to top back.
- Attach back waist band to waist pieces. If your top is wider than waist band, place darts to fit, this will give your dancer and fitted and professional look. ****
- Attach Collar or neck piece.
Note: cute at least 4” wide and 2-3” longer than neck piece in pattern. If you don’t have the neck pattern piece, take you neck measurement and add at least 6-8”. You can always cut off the extra. You just want to make sure it fits the neck line of you front and back top pieces.
- Spot fit NOW to ensure you don’t have to make any adjustments. I have had to scrap my top and start over many times so always allow for at least 1-2 extra yards of material.
- Insert zipper to center back top. Baste center back together, iron seam open, sew in zipper. This is my zipper method, feel free to use your own. Zipper goes from bottom of waist band to the top of the Collar or neck piece.
- Attach front waist band to front top, again use darts to fit.
- Leave side seams open for now.
Sleeve:
- If fit is good, cut out your sleeves. Measure sleeve pattern piece length and make sure it is at least 1.5” longer than dancer’s sleeve length. Also if your dancer has thick biceps or wrist make sure you are cutting it wide enough!
- Okay, I cheat. Your top should be “open”, not sewn at the sides on the shoulders. Makes sewing in the sleeve so much easier! Pin, gather any excess material at the shoulder, Sew.
- Once the sleeve is attached, you can sew sleeve closed along with side seam of top at the same time. Repeat with other sleeve.
Top Ruffle:
- Cut 2 pieces 5.5” wide. Chest ruffle 5.5”X44”, waist ruffle 5.5”X 66”.
Note: if you have petite girl you mightwant to make the chest ruffle shorter (still 5.5”wide), pin it and see how itlooks before you sew. The same goes for a girl that is busty.
- Use the two lighter colors for the top ruffles, and lace to the bottom edge of the ruffle. Hem the top edge of the chest ruffle.
- Once ribbon and lace are sewn on pin and sew.
- Sew ¼” lace to collar near the seam. ****
You are DONE!!!!!! Baile!!!
the original Jalisco, I made 5 years ago. She wore it well! She also washed it with a red Reboso and it is now tie dye pink and white. the skirt is now her practices skirt, I remade the Jalisco April 2012, picture at the begining of this page. It took me one week, I was on a dead line. :) only my Jane!!

